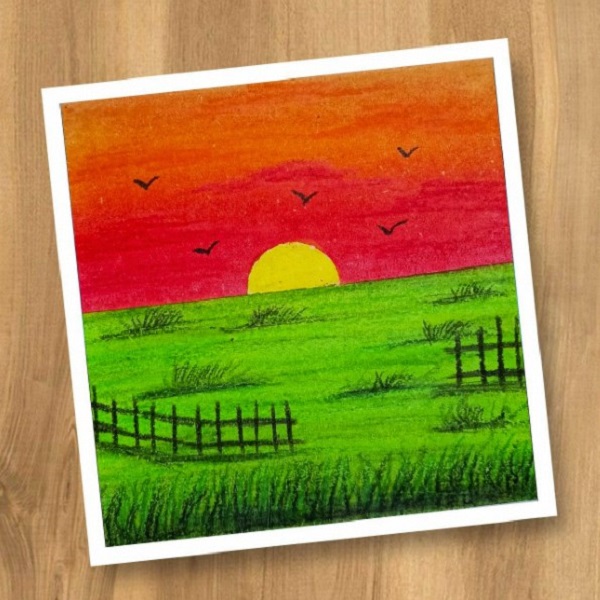
Introduction to Oil Pastel Drawing
Oil pastel drawing is a vibrant, accessible art form perfect for beginners. It’s a medium loved for its rich colors and the creamy texture that allows artists to blend colors seamlessly. As a beginner eager to dive into the world of sunset oil pastel drawing, understanding the basics can be both exciting and a bit daunting. Before you begin your creative journey, it’s important to grasp what oil pastels are. They are coloring sticks, composed of pigment mixed with a non-drying oil and wax binder.
This unique composition gives them a soft, buttery consistency and intense colors, which are ideal for creating striking sunset scapes. With beginner sunset oil pastel drawing, you can portray the warm shades of the evening sky with ease. Whether you aim to capture the serene moments of twilight or the dramatic hues of a setting sun, oil pastels are a forgiving medium that encourages experimentation. This guide will walk you through the necessary steps, from selecting the right supplies to the finishing touches of your artwork.
Essential Supplies for Oil Pastel Art
In starting your beginner sunset oil pastel drawing, the first step is gathering your supplies. High-quality oil pastels are a must. Look for brands that offer a good balance between softness and firmness. Soft pastels blend easily, while firmer ones provide more control for detail work. Here are the essential supplies:
- Oil Pastels: Choose a set with a variety of colors to capture the vibrant hues of a sunset.
- Drawing Paper: Opt for paper that’s thick and has a good tooth. It should hold pastel well.
- Paper Blending Stumps: These tools help you blend colors smoothly.
- Eraser: A kneaded eraser can lift off oil pastel without damaging your paper.
- Fixative: This spray will set your drawing and prevent smudging.
- Paper Towels or Cloths: Keep these handy for wiping your hands or tools.
Selecting the right supplies is critical for achieving the desired outcome in your artwork. With these tools in hand, you’re set to begin your journey into the colorful world of sunset scapes with oil pastels.

Step-by-Step Guide: Starting Your Sunset Drawing
Once you have your supplies ready, it’s time to start your beginner sunset oil pastel drawing. Follow this simple step-by-step guide to create your own sunset masterpiece:
- Plan Your Composition: Begin by visualizing the scene. Choose whether you want a serene twilight or a vivid sunset. Sketch a rough outline of your composition using a light pencil mark to guide your pastel application.
- Outline the Shapes: Draw the basic shapes of your sunset scene. Include the horizon, the sun, and any clouds or land.
- Block in Base Colors: Start with the lighter colors for the sky and sun. Then, apply darker shades where needed, like the lower sky or the landscape.
- Build the First Layer: Create a base by gently applying the oil pastels. Use broad strokes to cover the paper.
- Create a Color Gradient: For the sky, start with yellow near the sun, then add orange, red, and finish with blue at the top.
- Blend the Horizon Line: Use your blending stump to softly merge the sky colors with the horizon.
- Adjust Colors as You Go: Add more pastel layers to deepen the colors or adjust the gradient as necessary.
- Refine the Sun: Shape the sun by blending the edges. Avoid adding too much detail at this stage.
- Work on the Landscape: Use darker tones to give the landscape form and depth.
- Step Back Regularly: Evaluate your drawing from a distance to get a better perspective on color balance and composition.
Remember, oil pastels are forgiving, so don’t worry if things don’t look perfect on your first try. With each step, you’ll get closer to capturing a beautiful beginner sunset oil pastel drawing that you can be proud of.
Color Your Sunset: Understanding the Color Palette
When creating a beginner sunset oil pastel drawing, color selection is key. Start by observing different sunsets and noting the array of colors. The sun’s position in the sky influences color variations, from vibrant oranges and pinks to subtle purples and blues. Gather a palette that includes warm colors for the sky near the horizon and cooler colors for the upper sky.
- Warm Colors: For the lower sky, choose yellows, oranges, reds, and pinks. These hues reflect the sun’s radiant energy.
- Cool Colors: As you move up the sky, transition to purples, blues, and dark blues. These colors capture the sky’s depth as daylight fades.
- Accent Colors: To add drama, consider adding hints of green or turquoise for an extra pop in the color gradient.
Once you have your colors, practice mixing and layering them on scrap paper. See how they blend and create new shades. Remember, sunset skies are not monochrome; they are a tapestry of interwoven colors. Your ability to understand and replicate this can turn a good drawing into a great one. Use light touches to apply color and be patient as you layer to achieve the right shade and texture. By understanding and thoughtfully selecting your color palette, you’ll create a sunset that glows with realism and warmth.
Blending Techniques for Smooth Transitions
When creating your beginner sunset oil pastel drawing, blending is key for smooth color transitions. Following are ways you can blend effectively:

Soft Blends:
Start by lightly laying down your colors. Then, with gentle pressure, blend the areas where two colors meet. Use a finger or blending stump to mix the pastels.
Gradual Transitions:
For a subtle shift from one color to another, apply a light layer of the transition color over the border. Blend it until it naturally fades into both colors.
Overlay Blending:
Place a second color over the first and blend. This method can add depth and complexity to your sunset colors.
Directional Blending:
When blending the sky, use strokes that follow the direction of the sunset. This creates a more natural look as if the colors flow together.
Color Intensity:
To intensify a color, apply more pressure or add a fresh layer of oil pastel. Blend until you achieve the desired saturation.
Clean Tools:
Regularly wipe your blending stump or finger on a cloth to avoid unwanted color mixing. Keeping your tools clean helps maintain the purity of your colors.
Experiment with these techniques to see which work best for the effect you’re trying to achieve. Remember, practice makes perfect, and blending is an art in itself within your beginner sunset oil pastel drawing.
Layering and Texturing: Adding Depth to Your Sunset
In your beginner sunset oil pastel drawing journey, layering and texturing are vital steps. They add depth and life to your sunset scape. Here’s how to do it effectively:
Start with Layering: Begin by adding light layers of color. Press gently with your oil pastels. This will help you build a rich base.
Add Texture: Create texture by using a variety of marks. Try short strokes for clouds or dots for stars.
Use Color Variation: Don’t stick to one hue. Add different shades within the same color family to create variation.
Emphasize Highlights and Shadows: Use light colors for highlights and dark tones for shadows.
Experiment with Pressure: Press harder for more intense color or texture. Use light pressure for a soft blend.
Repeat Layers: Build up layers until you’re satisfied with the depth and richness.
Blend Carefully: Between layers, blend lightly. This helps keep the texture intact while merging colors.
By mastering these layering and texturing techniques, you can make your beginner sunset oil pastel drawing stand out. Keep practicing, and you’ll see your sunsets become more lifelike and dynamic with each creation.

Fixing Mistakes and Refining Details
As you work on your beginner sunset oil pastel drawing, you may encounter some mistakes. Don’t worry; oil pastels offer great flexibility for correcting errors. Let’s explore some tips for fixing mistakes and adding those all-important final details to your piece.
- Erase Carefully: If you need to remove unwanted oil pastel, use a kneaded eraser gently. It can lift the color without harming the paper underneath.
- Scrape Off Excess: For heavier mistakes, carefully scrape off the top layer with a craft knife. Then, reapply the correct color.
- Cover Up: You can also simply cover the mistake with another layer of oil pastel. Choose a color that blends well with the background.
- Refine Edges: Use a sharpened pastel or a pastel pencil to add crisp edges or small details that bring your drawing to life.
- Adjust Contrast: To make your sunset pop, strengthen the contrast. Darken the darks, and brighten the highlights where needed.
- Add Textures: Use the tip of your pastel stick to create fine lines and textures that can depict waves, clouds, or foliage.
Remember, practice is key in learning to refine your artwork. Be patient and keep tweaking your drawing to enhance its beauty and realism. Every adjustment is a step towards a more detailed and stunning beginner sunset oil pastel drawing.
Final Touches: Finishing Your Oil Pastel Sunset
As your beginner sunset oil pastel drawing nears completion, it’s time for the final touches that will bring your work to life. Here’s how to finish your oil pastel sunset with flair:
- Check the Balance: Look at your drawing from afar. Make sure the colors and elements are balanced.
- Enhance the Vibrancy: If needed, add another layer of oil pastel. This can make your colors more vibrant.
- Fine Details: Now, add small details that matter. Use a sharpened pastel for precision.
- Refine Textures: Go back to any area needing texture. Add it with care to make the scene pop.
- Highlights and Shadows: Revisit highlights and shadows. Strengthen these for more depth.
- Clean Edges: Ensure the edges of your shapes are clean. Use a pastel pencil if needed.
- Use Fixative: Once you’re happy with your drawing, spray it with a fixative. This will set your artwork and prevent smudging.
Remember, the beauty of oil pastels is in their blendability and texture. Trust your instincts, take your time, and don’t hesitate to make adjustments. Your beginner sunset oil pastel drawing should be a reflection of your vision and creativity. Enjoy the process and be proud of your creation!